Quick Start: Setting Up Your First Automated Ad, Step by Step
A complete beginner's guide — connecting an exchange, finding your ad in Inactive Ads, configuring every parameter, and enabling automation. Every parameter and toggle explained in detail.
Pilotbot Team
Author
On this page
- Step 1. Connect Your Exchange: Building Digital Bridges
- Step 2. Open the Dashboard: Safe Sandbox and Inactive Ads
- Step 3. Configure Parameters: Strategy Management Gear
- "Positioning" Tab
- "Limits Filter" Tab
- "Competitor Filter" Tab
- Step 4. Enable Automation: The Two Independent Toggles Concept
- Dashboard Anatomy: Monitoring and Market Pulse
- What Happens After Launch
- What to Explore Next

From Routine to Autopilot: Launching Your First P2P Ad in 5 Minutes
Manual P2P trading is like an endless race against the order book: constantly refreshing the page, checking competitors, undercutting prices by pennies, and keeping night vigils in front of the screen. Step away for half an hour — and your ads drop to the second page of the book while competing bots capture all the volume.
Pilotbot completely changes the rules of the game. It is not just a script, but a full-fledged operating system for a P2P desk: you configure rules and safety corridors once, and the pricing engine maintains your ideal rank 24/7.
This step-by-step walkthrough guides you from a blank canvas to an ad running on autopilot. In just a few minutes, your desk will begin operating autonomously.
Step 1. Connect Your Exchange: Building Digital Bridges
For Pilotbot's pricing engine to monitor the market and instantly update your quotes, it requires a secure communication channel with your exchange.
- Binance and Bybit: Connected via standard API keys. You generate a key in your exchange account with spot/margin trading and order management permissions, but without withdrawal rights. Detailed guides with screenshots: Connecting Binance and Connecting Bybit.
- HTX: Connected via a specialized secure browser extension — see Connecting HTX.
After successful linking, the account will appear in Pilotbot's left sidebar, and the system will begin synchronizing the current state of your ads.
Step 2. Open the Dashboard: Safe Sandbox and Inactive Ads
Navigate to the main section — the Dashboard. If your exchange is connected properly, your existing exchange ads will automatically load into the system and appear in the "Inactive Ads" section.
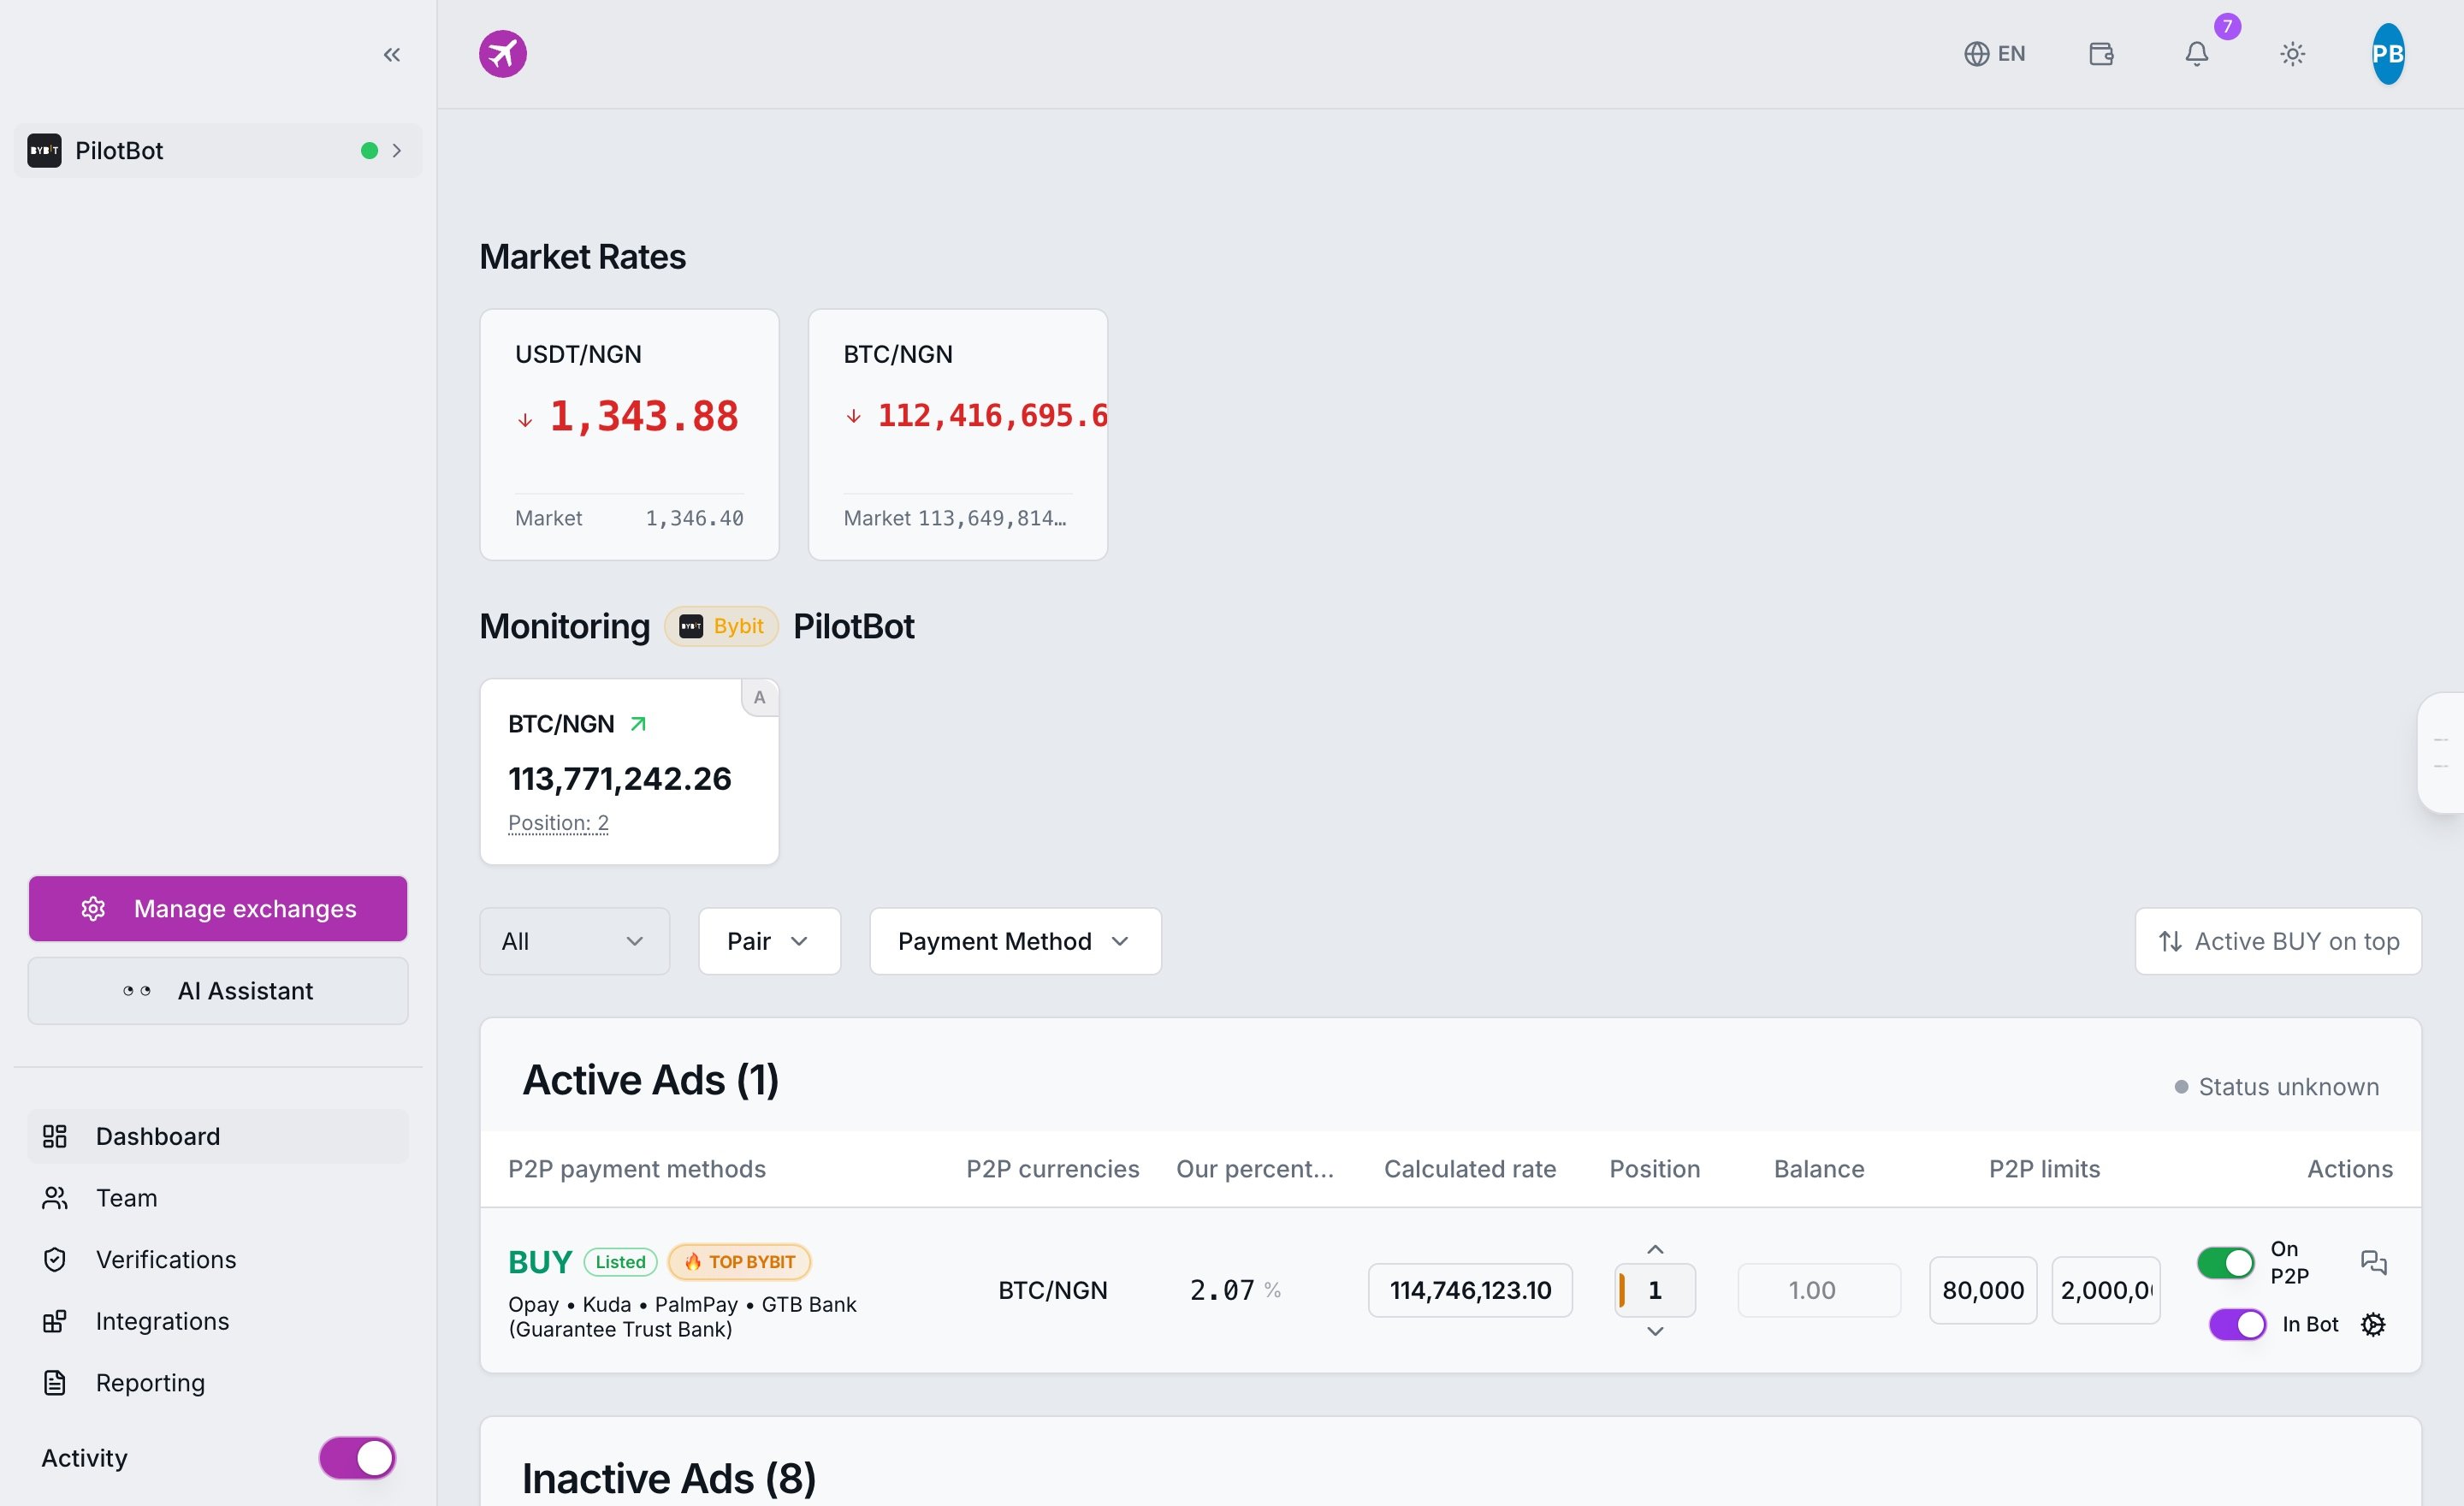
Why do ads land in the Inactive category? This is Pilotbot's fundamental safety principle: zero unexpected actions. The Inactive Ads section is your pre-flight sandbox. Here you calmly configure your strategy, limits, and steps without the system intervening in live trading.
Each ad row clearly displays all key metrics:
- Payment Methods: Linked payment methods and banks (SEPA, Faster Payments, Revolut, Wise, etc.).
- Currency Pair: Base asset and fiat settlement currency (e.g., USDT/EUR, BTC/USD, USDT/KZT).
- Our Percent: Current spread or margin markup relative to the base market rate.
- Calculated Price: Fair price computed by the mathematical core right now.
- Position: Current ad rank in the exchange order book among competitors.
- P2P Limits: Minimum and maximum order amounts in fiat currency.
- Actions: Gear icon to configure parameters and two automation toggles.
Step 3. Configure Parameters: Strategy Management Gear
Click the gear icon in the ad row. This opens the parameter configurator, organized into three logical tabs. Configure them before launching automation.
(If an AI Agent is enabled for the ad, some settings will be optimized autonomously by the algorithm and shown with a lock icon).
"Positioning" Tab
This is the computational core of your ad:
- Auto Mode:
- Enabled — The Calculated Price is continuously computed by the platform based on order book conditions, competitor quotes, and your rules. This is classic autopilot mode.
- Disabled — The ad switches to manual price fixing and maintains your entered static value.
- Target Position: Desired rank in the order book (
1for first place,2for second, etc.). In each cycle, the pricing engine computes a quote to hold this exact rank. - Undercut Step: The increment by which the pricing engine steps ahead of the nearest rival to claim the target rank. Must be a multiple of the market's minimum tick size (e.g.,
0.01,0.02,0.05). A larger step provides a resilient lead, but slightly compresses your net spread. - Max Deviation: A personal ceiling for permissible price shifts from the reference market benchmark. This is your local safety cushion operating within the platform's global hard corridor (±19.9%).
"Limits Filter" Tab
Defines which competitors the bot factors in when competing for rank:
- Limits From / To: The range of order amounts you care about. Competitor ads with micro-limits (e.g., small test amounts) will not affect your positioning if your operational desk handles commercial volumes.
- Min Limits Difference: Filters out clone ads with virtually identical ranges, shielding your algorithm against order book manipulation.
"Competitor Filter" Tab
Fine-grained counterparty selection:
- Merchants Only: When enabled, the system factors in only verified merchants with security deposits and high completion rates. Casual sellers and novice accounts are ignored.
- Ignore Competitors: A list of competitor nicknames to exclude from analysis. Ideal for isolating your bot from reckless price-cutters or toxic bots.
A complete specification of every configuration field is available in Ad Settings in Detail.
Step 4. Enable Automation: The Two Independent Toggles Concept
In every ad row, you will find two independent toggles. They are deliberately uncoupled so you maintain 100% control over the situation:
- "In Bot": Hands the ad over to Pilotbot's pricing engine. Switch it on — and the ad moves to the "Active Ads" section, while the pricing engine begins continuously calculating and updating quotes within your safety corridors.
- "On P2P": Controls the actual visibility of the ad on the exchange. When ON, takers can see your order in the book. When OFF, the ad is hidden from public view on the exchange.
The optimal state for live trading is In Bot: ON + On P2P: ON. In this state, your ad is visible on the exchange, and Pilotbot continuously secures a profitable position for it.
Detailed breakdown of all toggle scenarios: Managing Ads and the Two Toggles.
Dashboard Anatomy: Monitoring and Market Pulse
- "Rates" Section (Top of Dashboard): Information cards for each currency pair. The large number represents the reference benchmark rate used for mathematical computations. The adjacent "Market" figure indicates current average market temperature. Details in Rates Section in Detail.
- "Monitoring" Section: Real-time heartbeat of your active ads. Displays current price, rank, and worker status with an AUTO badge. Clicking a card opens the live order book so you can see who sits directly ahead of and behind you. Read the Worker Monitor Guide.
What Happens After Launch
Once the toggles are activated, Pilotbot takes over the routine:
- 24/7 Surveillance: The system continuously monitors the order book and immediately updates prices upon any shift in market conditions.
- Rapid Execution: Quote refresh intervals depend on your subscription plan — review Plans and Limits.
- Crash and Freeze Protection: If the market goes into an abnormal dive, the multi-tier safety corridor freezes quotes to prevent loss-making trades. Read more: Why Price Looks Frozen.
What to Explore Next
- Step-by-Step Guide to Connecting Binance
- Step-by-Step Guide to Connecting Bybit
- What Is an AI Agent and How to Delegate Strategy to It
- Complete Ad Parameters Reference
- Security Policy and Price Corridors
Ready to unleash the full power of your P2P desk? Start by connecting your first exchange.